2016年5月31日 星期二
2016年5月17日 星期二
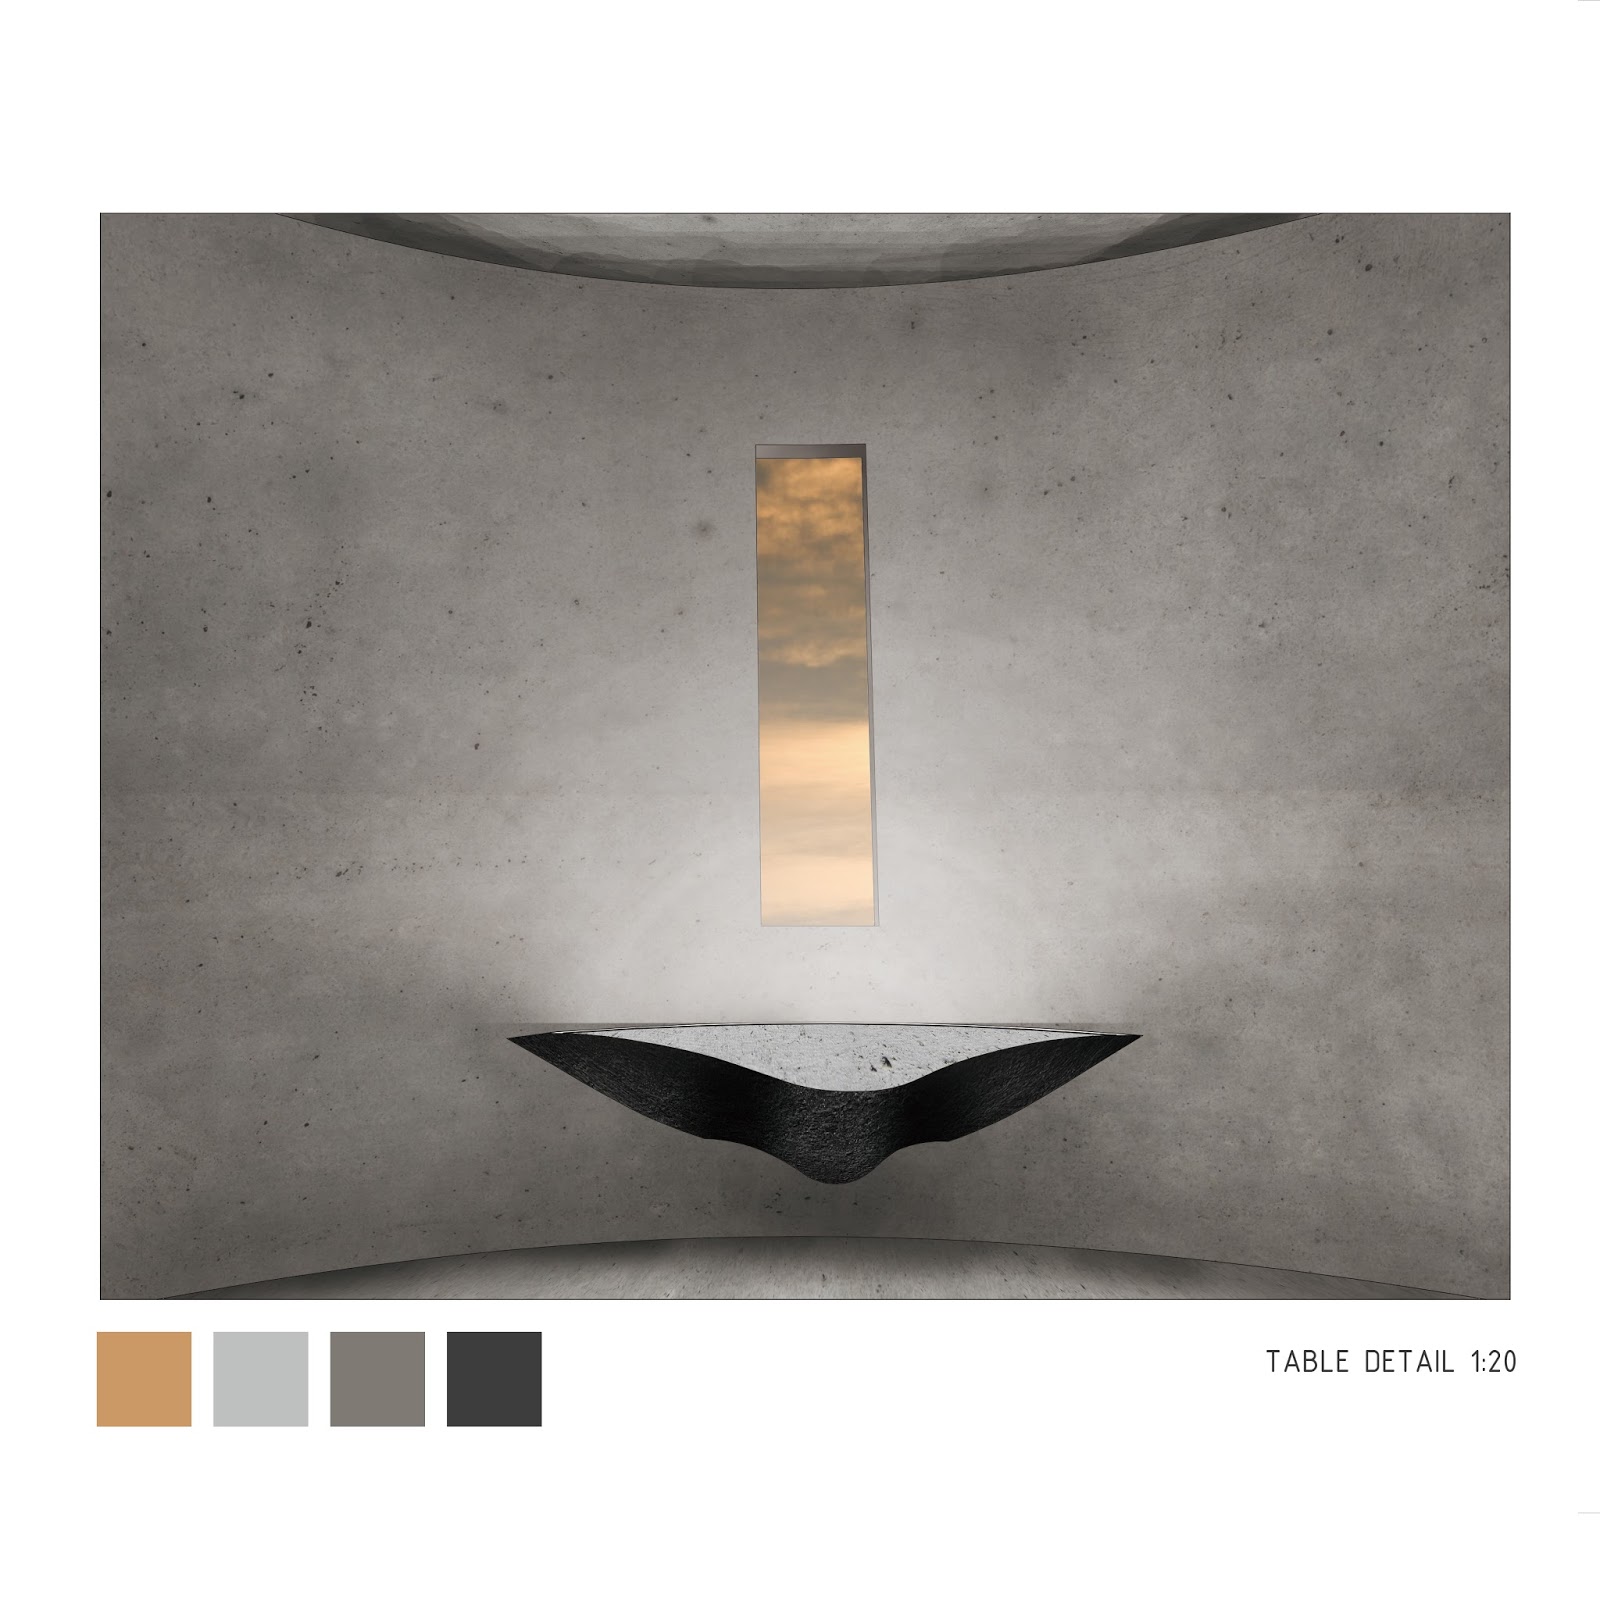
Second Try + Final skin
Second Try + Final Skin
To get a correct shape of the flat bottom of spoon, I use paper to figure out the size of the bottom. |
| After tracing, cut the shape out |
 |
| In order to figure out where I need to adjust, I put the paper in the metal. |
 |
| Trace over the paper to mark out the correct size of the bottom |
 |
| Then using wood edge to make the bending edge clear and fit with the mark |
 |
| After I got the bottom part done, I move on with the spoon handle part. By using steel tool the get a bending along the handle. |
 |
| At the meantime, I have to make sure that the the edge of the handle did not change the shape when I was bending along the handle. |
 |
| This image shows that I almost got all the shape done with the spoon. |
 |
| The final skin is shown as photo, I do too much cutting at the front part and should have more bending at the handle which should fit in more. This object really brings me a lot of challenge at the time but also provide me an opportunity to learn more making skill. |
2016年5月12日 星期四
Start with hammer
Start with hammer
After I cut off the shape I need, I start to bend all the edge in. By bending these edges, I start to understand that how much bending I have to do in different part.
 |
| I focus on the front part of the spoon first |
 |
| Try to bend all the edge to fit with the model |
 |
After a hour, I found a difficulty with bending, once I make two side fit in the front side will be push away from the model. I start to find another way to shape the metal.
I decide to bend the metal into a long U shape , after that I start to shrink those edges.
 |
New object Start up
Start up
First, by tracing over the model on paper, I can get to understand how many metal I gonna use and also realize the shape I need to cut off.
 |
| Trace over the model on the paper |
 |
| Cut off the shape that I need |
 |
| This is the shape I got |
2016年5月10日 星期二
Steve Yu's SPOON
Steve Yu's SPOON
The object I choose is a spoon from Steve who is study Architecture, I found that the different between interior architecture and architecture students' choice is the different focus of the object.
Whit the spoon, Steve more focus of the space that create by the object.
 |
| But with a my opinion who is a interior student, I think the curve skin of the spoon are more attractive that the space create by spoon, That is my view point of the choice between different major student. |
2016年4月26日 星期二
Final look
Final look
After all this process, I am really glad I got this perfect my metal sheet perfectly fit with my model. These photos below shows different angel view that how they fit together .


Final attempt
Final attempt
 |
| figure 1 |
 |
| figure 2 |
By using different metal tool and hammer to achieve different purpose the tool show as figure 2 allow me to create a tiny pop up on the metal sheet
 |
| figure 3 |
The tool show as figure 4, it provide me a curve shape to follow with. it is the tool that I use to fit my metal sheet into the model's base curve (figure 5).
 |
| figure 4 |
 |
| figure 5 |
2016年4月22日 星期五
First Attempt
First Attempt
 |
| figure 1 |
First I use paper to cover my model to figure out what kind of shape I gonna cut out in my metal sheet. After that I use scissor to cut out the shape and draw it over on the metal sheet.
Once I got my correct metal sheet shape, I use marker to mark out which part I need to bend it in (figure 1).
 |
| figure 2 |
I did try to mark a line on anther side (figure 2) and the fact is, I just make worse than before. Once I start to bend the sheet on the other side, the metal start be stretched and be twisted. You should always bend the metal by same side.
 |
| figure 3 |
2016年4月21日 星期四
Final Template
Final Template
The final template is 290 mm long, 100 mm wide and 120 mm high. I am glad that it doesn't change a lot from real object to laser cut model. I do a little adjustment of the size just to fit my layout into two plywood sheet but it almost a 1 :1 model. The most important thing I want focus on the object is the curving surface and the cure shape base. I will really work on how to fit the metal sheet with the model.


2016年4月20日 星期三
123D Make
123D Make
 |
| figure 1 |
There are several things have to be aware, the first thing is the size of the laser cutting material. The maximum size of laser cut machine in UNSW Fab Lab is 600 mm*300 mm.
Another important thing is the thickness of the material, I chose 3 mm thick plywood to be my laser cutting material. My laser cut model is an interlocked model which will create a waffle structure (figure 1).
For my personal experience, if the model is a interlocked model,, it is batter to make 0.5 mm thicker when you inter the thickness in 123D make. Whit this setting, it will be much more easy to join each piece together especially for plywood as plywood is a material which won't always be flat.
The laser cutting layout should be like figure 2, it will have a preview of the layout at the right side. As the preview, my model will cost two sheet of plywoo and it will be 14 parts to join together.
 |
| figure 2 |
2016年4月19日 星期二
Laser Cutting
Important notice for laser cutting
 |
| Figure 1 |
- First step: select all the line in the file and make sure change the stroke weight into 0.001(Figure 1)
- Second step: Change the structure line color into red and the word color into blue (figure 2, 3)
 |
| Figure 2 |
 |
| Figure 3 |
2016年4月17日 星期日
Start by 123D Catch and Meshmixer
Start by 123D Catch and Meshmixer
 |
| figure 1 |
Create your first project
Software Download
123d catch Download
 |
| figure 2 |
By using meshmixer I be able to make the surface smoother and fill all the hole in the mesh. The completed model should be smooth and solid, it can be seen at figure 2, 3.
Tutorial collection for mesh mixer: Meshmixer tutorial
Meshmixer official website
 |
| figure 3 |
2016年4月13日 星期三
Choose object
Choose object
The object I choose is a basketball shoes (figure 1) which is my inspiration of my second year project. It is a project that ask us to design a restaurant, I inspired by this shoes' curve and color which fit with my concept " Highlight in the dark". By using curving wall and point light (figure 2 ) I got a great achieve with this project. And the color of the shoes also give me some idea of my material choosing (figure 3).
 |
| figure 1 |
 |
| figure 2 |
 |
| figure 3 |
訂閱:
意見 (Atom)